
Barbarian is one of the best classes you can go with in Diablo 4. However, simply choosing the best class won't take you far. Along with that, it's equally important to choose the right build as well. That's why, today, I will cover the best Diablo 4 Barbarian build so that you can exploit the abilities of this class to the maximum.
Diablo 4 Barbarian Build Overview
The build you should go with when it comes to the Barbarian class is the Rend Build. The advantages of going with this build are:The detailed post below will help you understand how to create this build, use your skill points, and utilize the paragon boards to become even more powerful.

D4 Barbarian Build Skills Breakdown
Getting the skills and respective upgrades right is important to execute this build well. The section below will cover the skills needed in great detail.Lunging Strike
Lunging Strike is a skill that helps you inflict damage on an enemy in front of you. Whenever you use this skill, you also generate Fury, which you can spend later. Besides inflicting damage, you can also use this skill for mobility. The 2 upgrades of this skill include:One of the main advantages of Lunging Strike is that the generated Fury can be spent on other skills.
Rend
Rend is so effective because it Cleaves the enemies in front, inflicting significant damage on them and also causing bleeding damage for 5 seconds.As highlighted above, Rend is at the center of this build. It can inflict significant damage on enemies and also causes bleeding damage. Apart from this, you can always gather up the enemies behind you by moving around and then turning around to unleash Cleave, which will also result in bleed damage, which helps you deal with multiple enemies effectively.
Once you have Furious Rend by your side, you will get half the Fury back whenever you hit 5 or more enemies. The trick as highlighted above is to run around till they gather behind you.
Death Blow
Death Blow is a skill that helps you execute a kill strike, which means anyone in front of you suffers extensive damage. If you kill that enemy the cooldown timer is reset which means you need not wait long to use this skill again. Upgrades include:Rend comes in handy for Cleave damage, and Death Blow comes in handy for bosses and elite enemies. Reason being if you reduce the health of elites partially before using the Death Blow, you can indeed finish them off once you use this skill.
This means it can serve as the Death Blow if you time it right. Besides, when you kill the enemy, the cooldown timer is reset, you earn 20 Fury, and you can use it on the next target, making it a pretty powerful skill.
Rallying Cry
Rallying Cry helps you increase mobility speed by 30% and enhance Resource Generation by 40%. The time limit is 6.5 seconds. It also helps the nearby allies with advantages for 3.2 seconds.Rallying Cry imparts a combination of speed and some crowd control. The generated Fury helps you execute other skills like Rend, aiding your progress.
War Cry
War Cry increases your Damage Dealt by 15% for 6.5 seconds. The benefit to allies nearby is 3.2 seconds.Upgrades include:
Even with this build, you will encounter enemies that aren't easy to take down. That's when you should use War Cry because it will increase the damage. With the upgrades, you can deal with a large number of enemies.
Call of the Ancients
This skill helps you call 3 Ancients who come to your aid for 6 seconds in the following ways:Upgrades include:
The extensive damage this skill can cause is why I have recommended this as Ultimate. Furthermore, the upgrades increase the damage and provide an opportunity to get Fury. When enemies surround you and want a way out, this Ultimate can come to your rescue.
Read more in our: Diablo 4 Story - Lore, How It Started, And Ending
D4 Barbarian Build Passive Breakdown
The best way to take down enemies is to have the right passives. But which ones are best for this build? Check the list below to find out.Hamstring
Hamstring supplements the bleeding effect. Using it on healthy enemies will slow them down by 20%, 40%, or 60%. Thus, you can inflict damage and limit their mobility, which helps you eliminate them easily.Booming Voice
Booming voice supplements the Shout Skill. The Shout Skill helps you reduce enemy damage by 40% for 6 seconds. Booming Voice increases this duration by 8%, 16%, or 24%.Pit Fighter
While the above passive was more defensive, this one's on the attacking side. It helps increase the damage you inflict on close enemies by 3%, 6% or 9%. As for distant enemies, you can reduce their damaging capability by 2%, 4% or 6%.Unbridled Rage
Unbridled Rage helps you inflict much more damage on the enemy—up to 135% more. However, there is a downside to it as well. It will cost you 100% more Fury. Thus, if you activate this passive, ensure you have active skills that generate Fury rapidly.Raid Leader
Want something that can also help your allies? Try Raid Leader. It can help you heal your allies with your Shouts up to 3% of their maximum life per second.Guttural Yell
Guttural Yell helps you reduce the damage that enemies inflict on you. When this passive is active, Your Shouts reduce enemy damage by up to 12% for 5 seconds.Tempered Fury
Many aspects of this build rely on the Fury you generate. You can't execute this build well if you can't generate and collect it in copious amounts. That's why I recommended Tempered Fury as a passive. It can increase Maximum Fury by up to 9.Invigorating Fury
It's always a good idea to have a passive that has a healing effect. Invigorating Fury helps you heal yourself up to 9%, but it costs 100 Fury. The passive comes in handy when you are fighting hordes of enemies.Cut to the Bone
When this passive is active, you can further amplify the damage caused by your Bleeding Effects by up to 15%. However, this passive is limited to Vulnerable enemies. Since you are dealing with hordes of enemies you have to slay, this passive is handy.Aggressive Resistance
As a Barbarian, you'll use Berserking repeatedly to thwart or attack enemies. Aggressive resistance helps you while Berserking by reducing enemy damage upto 10%.Prolific Fury
The passive I am speaking about now is once again associated with Berserking. During that duration, this passive increases Fury Generation up to 18%, which certainly comes in handy when you need healing (Hint: Invigorating Fury!) and using skills.Pressure Point
Want to finish off enemies faster? That's where Pressure Point can come in handy. The Pressure Point Lucky hit gives you up to 30% chance to make enemies vulnerable for 2 seconds. During this time, you can use your active skills or let the passive ones do their job to finish off the enemies.If you look at the passive skills breakdown above, you realize they are the right mix of attacking and defensive passive skills, ensuring you have a balanced build and can easily slay enemies.
Diablo 4 Barbarian Specialization
The unique mechanism for Barbarians is known as the Arsenal System. Once you reach level 5, the system will unlock on its own. Apart from the system you need to unlock something known as Technique Slot. The Technique Slot unlocks when you reach level 15. However, this slot doesn't unlock on its own. On reaching that level, you will come across a quest known as Masters Of Battle. Complete this quest, and the Technique Slot will unlock.You might think, what's this Arsenal System?
The Arsenal system allows Barbarians to carry up to 4 weapons. Then, you can assign these 4 weapons to 4 attacks. The player can then earn various bonuses when executing these attacks. The bonuses you gain start at Level 1. Your experience will increase with each hit, and the bonuses will follow eventually.
Use a particular weapon/attack frequently, and not only will the weapon level go up, but also the associated bonus. Once you unlock the Technique Slot, equip it with a separate weapon, which will further buff the weapon and the damage caused by the skill associated with that weapon.
In a nutshell, the Arsenal System allows you to carry 4 weapons, associate them with certain attacks, and after that use them more to make the weapons and the attacks more powerful.
Now that you know the Arsenal system, I will highlight how to use it with this build. I will cover 2 weapon slots because those make the most difference.
Many players think the Arsenal mechanic of Barbarians isn't as powerful as the specialization of other classes. While this can be true to a certain extent, but if you know how to use it correctly, you can indeed make a difference with it.
The Arsenal mechanic will unlock once you reach level 5. The first slot you get at this level should be equipped with a two-handed sword. The advantage is that whenever you damage enemies directly, you can cause them to bleed. Couple that with a hamstring, and you can slow down the enemies. After that, you can inflict heavy damage on enemies.
The second slot of the mechanic you get at level 15 should be equipped with a two-handed axe. Equipping this weapon will increase the damage you inflict on Vulnerable enemies by 15%.
Note The percentages highlighted above might be lower at the start, but as you gain weapon expertise, they will reach the levels mentioned above.
Barbarian Build Skillpoints Distribution
Table below covers how to spend points to execute this build well. Table highlights Renown use as well.| Levels | Skill | Purpose |
|---|---|---|
| 2 | Lunging Strike | Activates the skill |
| 3 | Enhanced Lunging Strike | Increases damage and adds conditional healing ability |
| 4 | Rend | Activates the skill |
| 5 | Enhanced Rend | Increases Vulnerable duration for enemies hit |
| 6 | Furious Rend | Helps you generate Fury for every enemy hit |
| 7 | Battle Lunging Strike | Helps you inflict bleeding damage |
| 8 | Rallying Cry | Activates the skill |
| 9 | Enhanced Rallying Cry | Helps you gain Unstoppable when skill is used |
| 10 | Tactical Rallying Cry | Aids Fury and Resource Generation |
| 11 | Rend tier 2 | Further increases damage inflicted |
| 12 | Rend Tier 3 | Further increases damage inflicted |
| 13 | War Cry | Activates the skill |
| 14 | Enhanced War Cry | Provides Berserking along with War Cry |
| 15 | Power War Cry | Increases damage bonus if 6 enemies are nearby when use the skill |
| 16 | Rend tier 4 | Further increases damage inflicted |
| 17 | Rend tier 5 | Further increases damage inflicted |
| 18 | Hamstring | Activates the passive skill that helps you slow down enemies |
| 19 | Death Blow | Activates skill to deal damage to enemies in front |
| 20 | Enhanced Death Blow | Increases damage of skill by 100% when dealing with bosses |
| 21 | Fighter’s Death Blow | Helps gain Fury when you hit at least 1 enemy |
| 22 | Death Blow tier 2 | Increases damage dealt |
| 23 | Death Blow tier 3 | Increases damage dealt |
| 24 | Death Blow tier 4 | Increases damage dealt |
| 25 | Call of the Ancients | Activates the skill to call 3 Ancients |
| 26 | Prime Call of the Ancients | Provides bonus attack speed and higher damage when skill is active |
| 27 | Supreme Call of the Ancients | Boosts power of ancients one way or the other |
| 28 | Death Blow tier 5 | Increases damage dealt |
| 29 | Booming Voice | Activates skill to reduce enemy damage when Shout skill is used |
| 30 | Booming Voice tier 2 | Further helps reduce enemy damage |
| 31 | Booming Voice tier 3 | Further helps reduce enemy damage |
| 32 | Pit Fighter | Activates passive to inflict more damage on close enemies and reduce damage capabilities of distant enemies |
| 33 | Pit Fighter tier 2 | Enhances skill attributes further |
| 34 | Pit Fighter tier 3 | Enhances skill attributes further |
| 35 | Unbridled Rage | Activates passive to inflict more damage |
| 36 | Rallying Cry tier 2 | Enhances skill attributes further |
| 37 | Rallying Cry tier 3 | Enhances skill attributes further |
| 38 | Rallying Cry tier 4 | Enhances skill attributes further |
| 39 | Rallying Cry tier 5 | Enhances skill attributes further |
| 40 | Raid Leader | Activates passive skill which helps allies |
| 41 | Raid Leader tier 2 | Amplifies skill benefits |
| 42 | Raid Leader tier 3 | Amplifies skill benefits |
| 43 | Guttural Yell | Activates passive which reduces damage inflicted by enemies |
| 44 | Guttural Yell tier 2 | Enhances skill benefits further |
| 45 | Guttural Yell tier 3 | Enhances skill benefits further |
| 46 | Tempered Fury | Activates passive which aids Fury generation |
| 47 | Invigorating Fury | Activates passive which heals you |
| 48 | Invigorating Fury tier 2 | Enhances skill benefits further |
| 49 | Invigorating Fury tier 3 | Enhances skill benefits further |
| Renown | Cut to the Bone | Activates passive to amplify Bleeding Effects |
| Renown | Cut to the Bone tier 2 | Enhances skill benefits further |
| Renown | Cut to the Bone tier 3 | Enhances skill benefits further |
| Renown | Aggressive Resistance | Activates passive to reduce enemy damage |
| Renown | Prolific Fury | Activates passive to aid Fury generation |
| Renown | Prolific Fury tier 2 | Enhances skill benefits further |
| Renown | Prolific Fury tier 3 | Enhances skill benefits further |
| Renown | Pressure Point | Activates passive which can help you make enemies Vulnerable |
| Renown | Pressure Point tier 2 | Enhances skill benefits further |
| Renown | Pressure Point tier 3 | Enhances skill benefits further |
Paragon board and Glyph breakdown
Choosing the right paragon boards will help you use the Glyphs in the right way and boost the important attributes of your character to utilize this build in the best possible way.1. Starting board
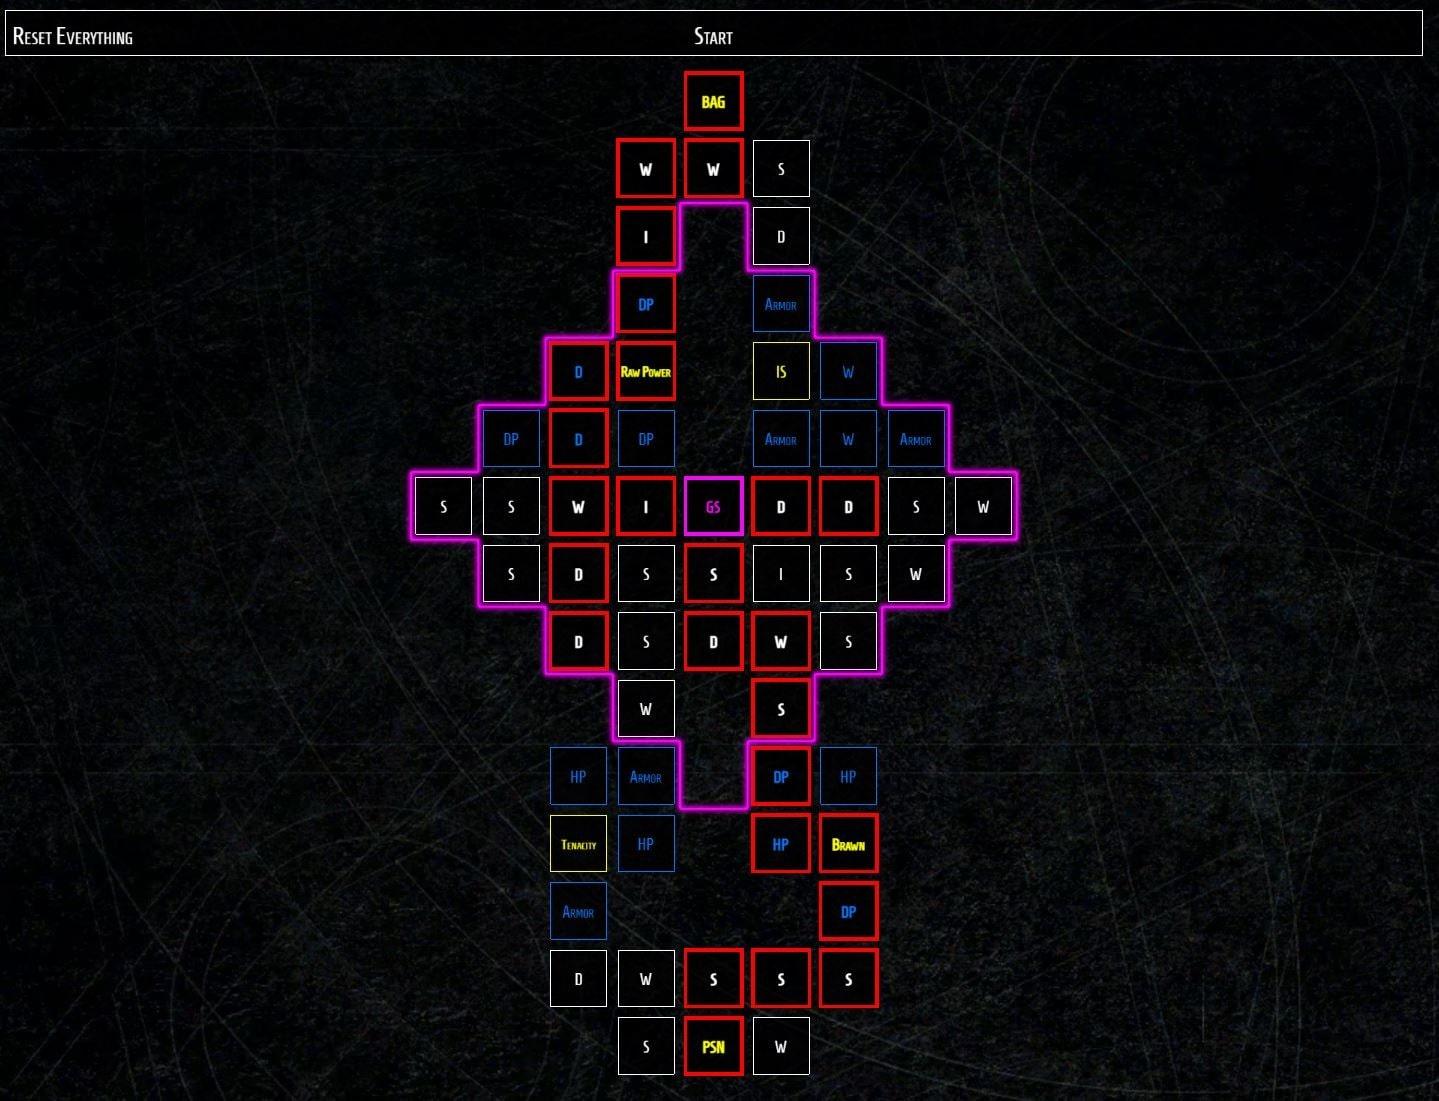
The best way to utilize this board is to move directly towards the Glyph socket and choose Territorial Glyph. Utilize all the Dexterity nodes in the vicinity, and thereafter progress to Iron Strength and Raw Power. Move towards the upper left area of the board to reach the exit node. For the next board, choose the Weapons Master Board.
2. Weapons Master Board
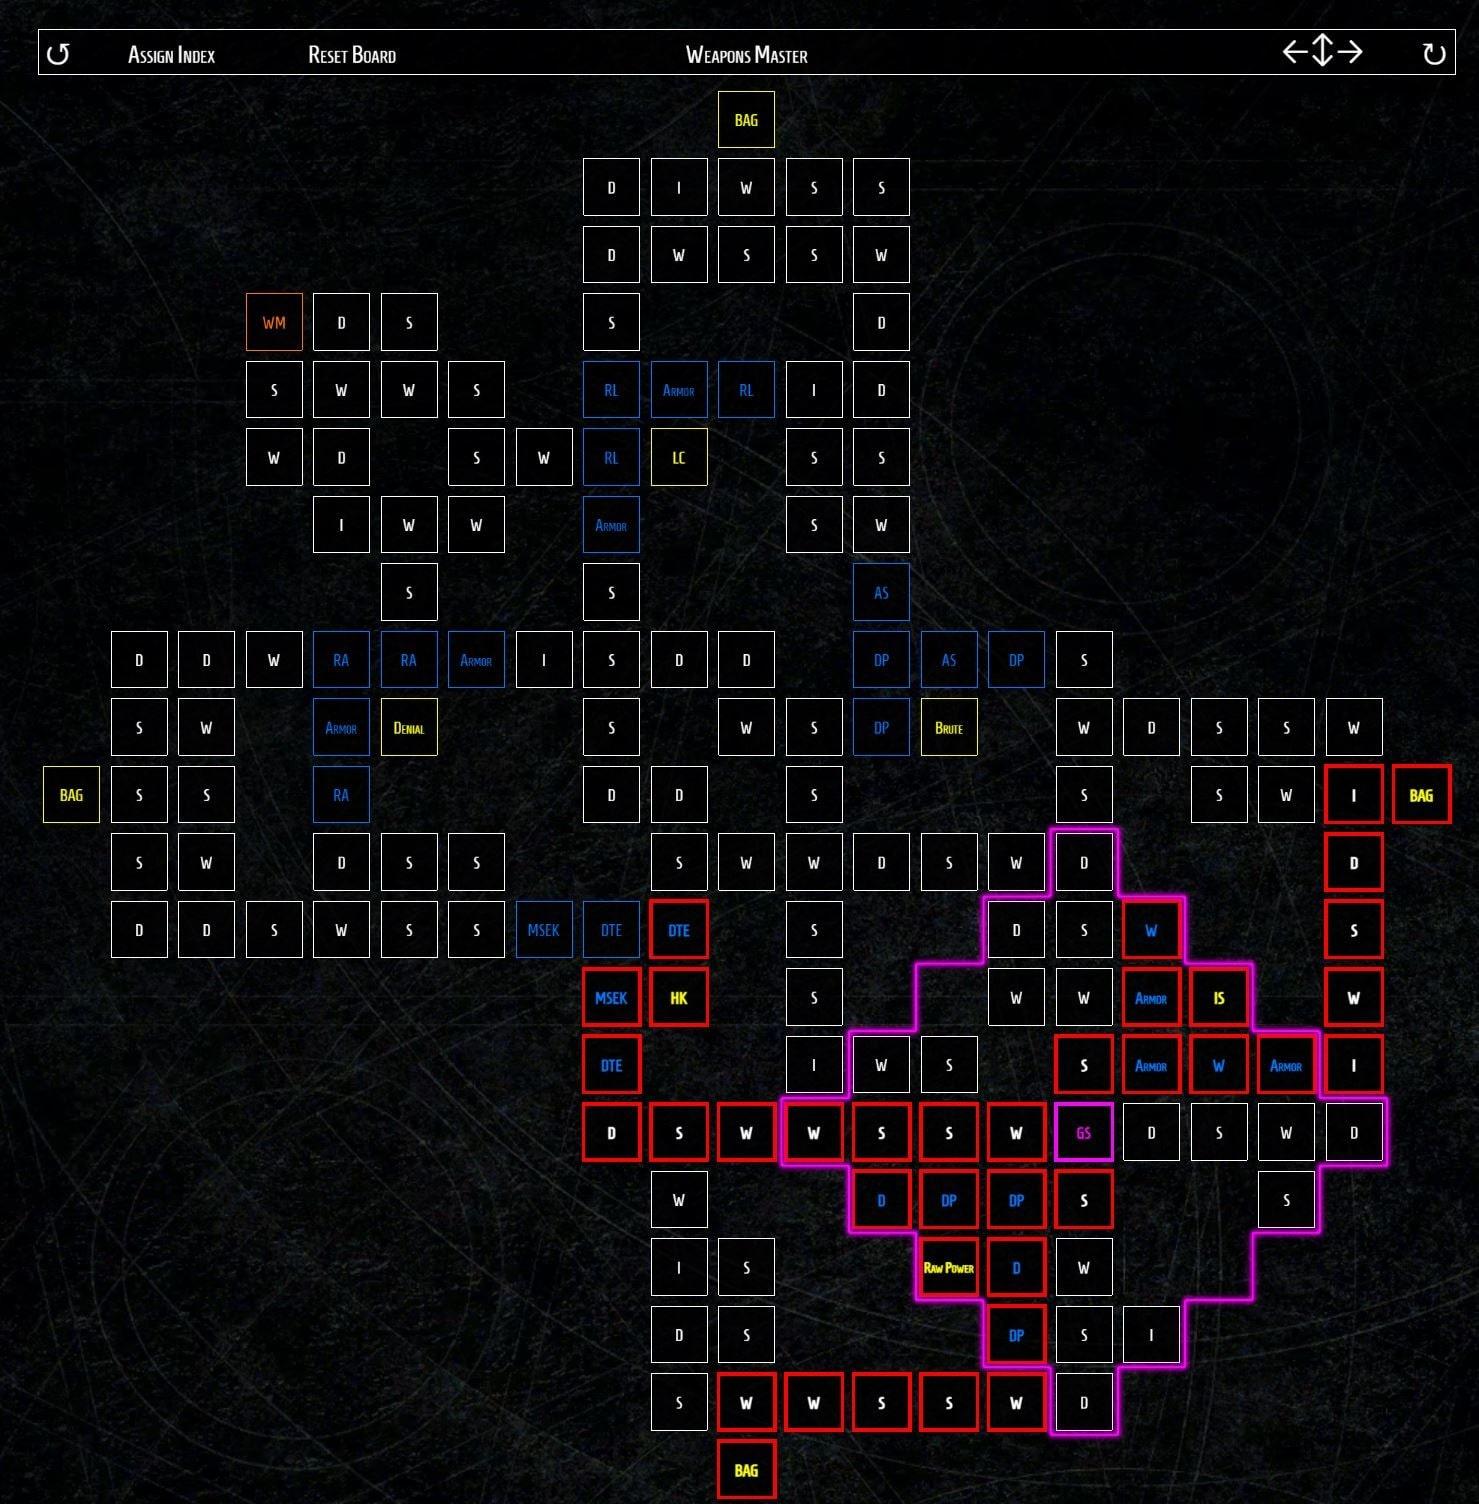
Before progressing in any direction on the board, rotate it such that the Glyph socket is in the bottom right corner of the board. Thereafter, move towards the Glyph node and utilize the Raw Power node that comes in the way. Use Marshal in the Glyph socket. In the vicinity of the Glyph socket, you will find Strength Nodes, including the Iron Strength Node and the Magic Nodes. Unlock them and move towards the board exit. The next board you should attach is the Warbringer Board.
3. Warbringer Board
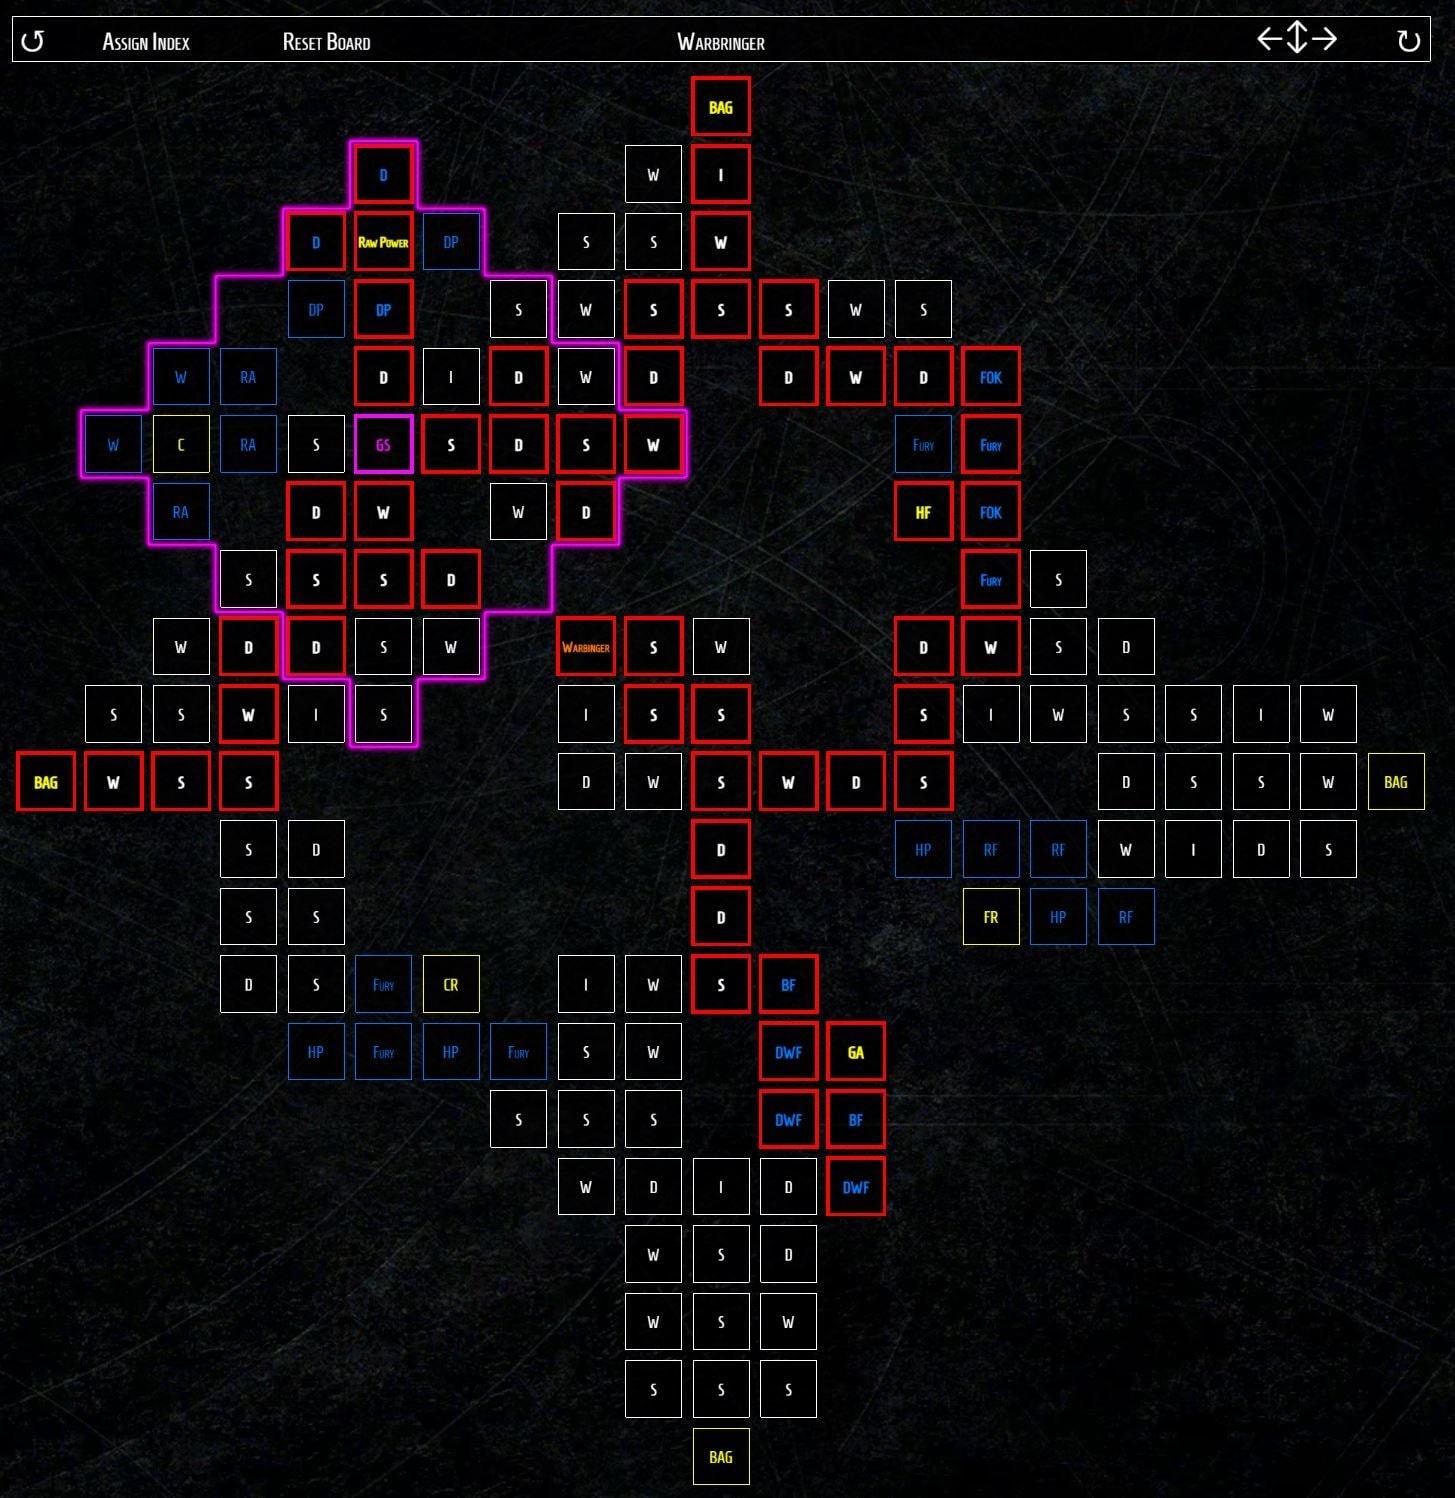
Before unlocking any nodes on the board, rotate them until the Glyph socket is in the upper left corner of the board. Directly move towards the Glyph socket, and upon unlocking it, place the Wrath Glyph in the socket. Your next job is to unlock the Dexterity Nodes in the area impacted by the Glyph, followed by the Raw Power node.
After doing so, move towards the Hungering Fury node on the right side of the board. Next you need to unlock the Warbringer Node by progressing in the down direction. Thereafter, move towards the Guarded Advance node, which is further south, but do ensure you unlock the Magic Nodes in its vicinity. After that, progress in the upper direction to exit the board. The next board you should attach is the Decimator board.
4. Decimator Board
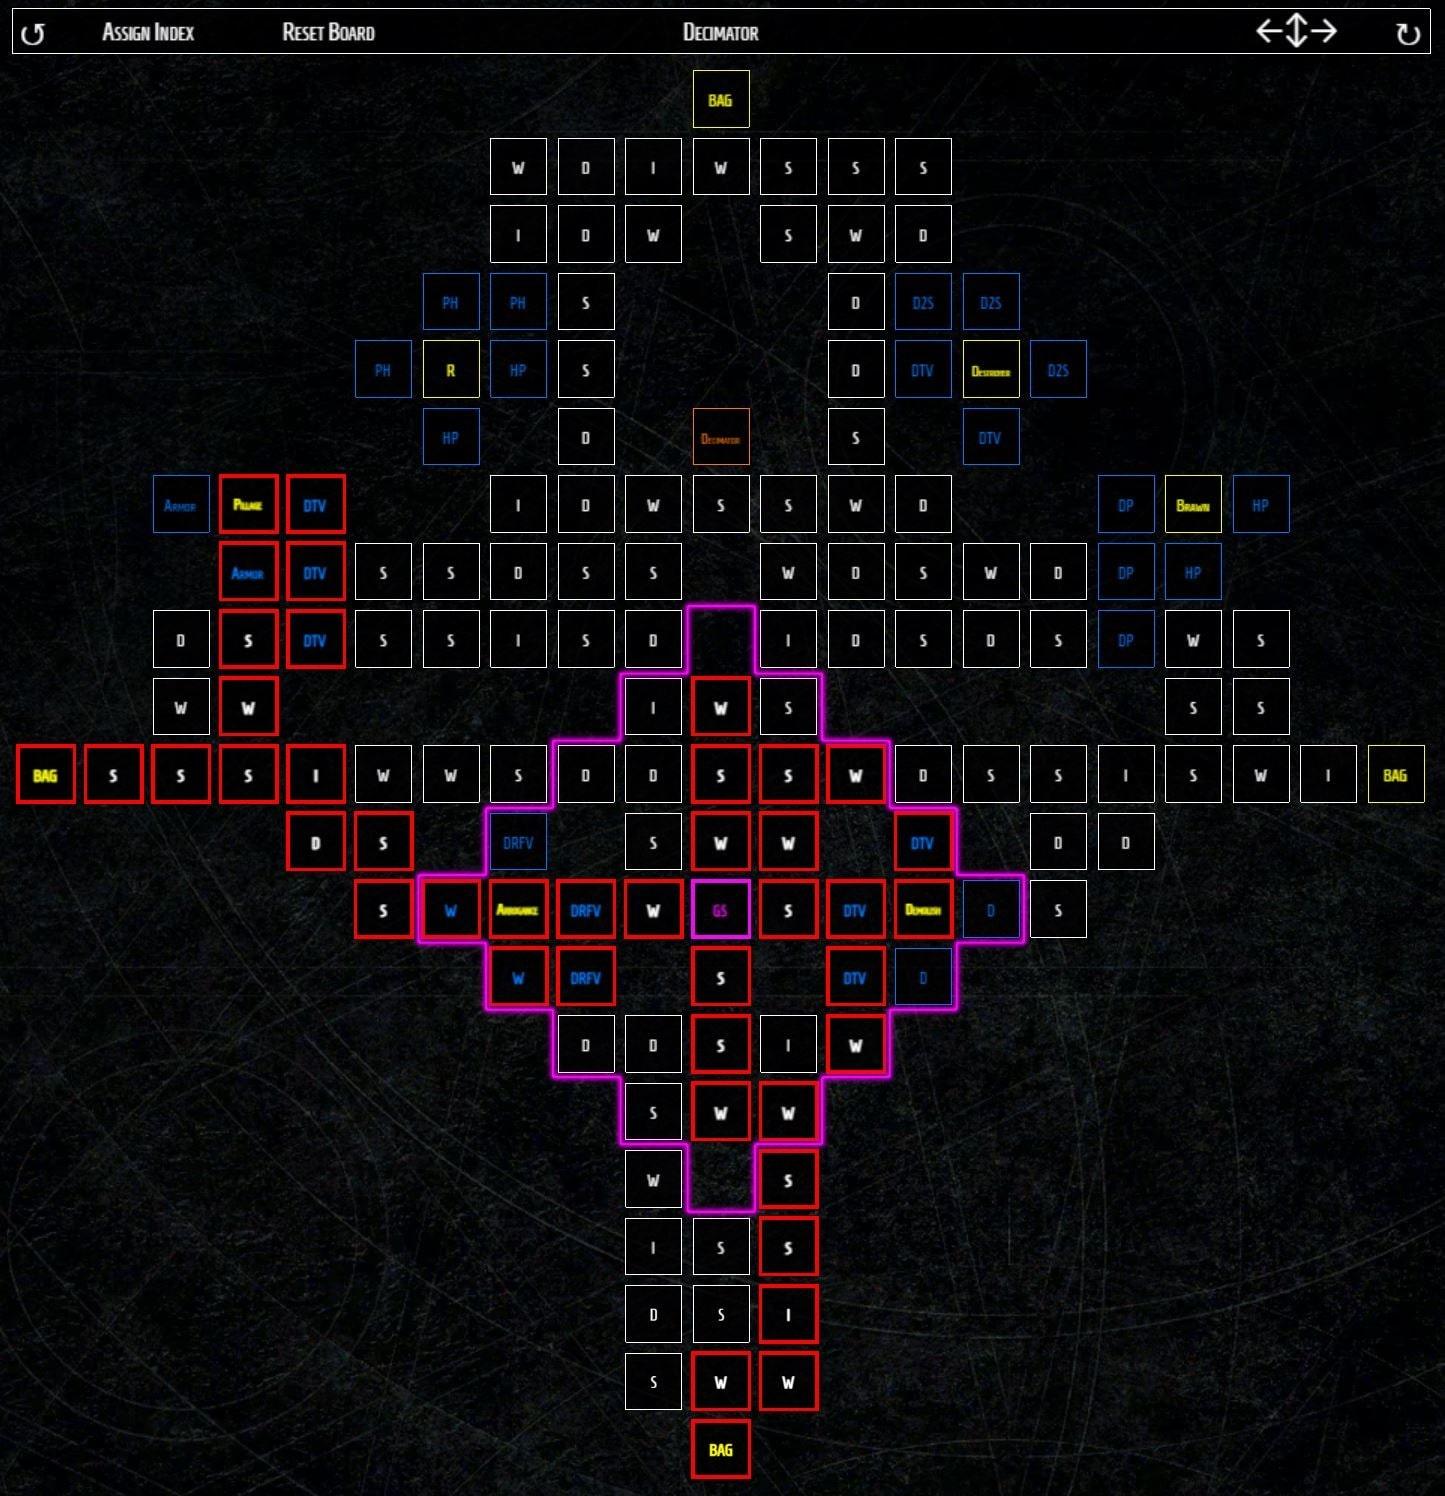
Rotate the Decimator board until the Glyph socket is near the center but slightly downwards. Move towards the Glyph socket and place the Disembowel Glyph in the socket. Next on your list should be the unlocking of the Willpower Nodes and then move towards the Demolish and Arrogance nodes. Head in the Northwest direction to unlock Pillage node. Thereafter, exit the board by moving in the left direction. The next board you should attach is the Bone Breaker board.
5. Bone Breaker Board
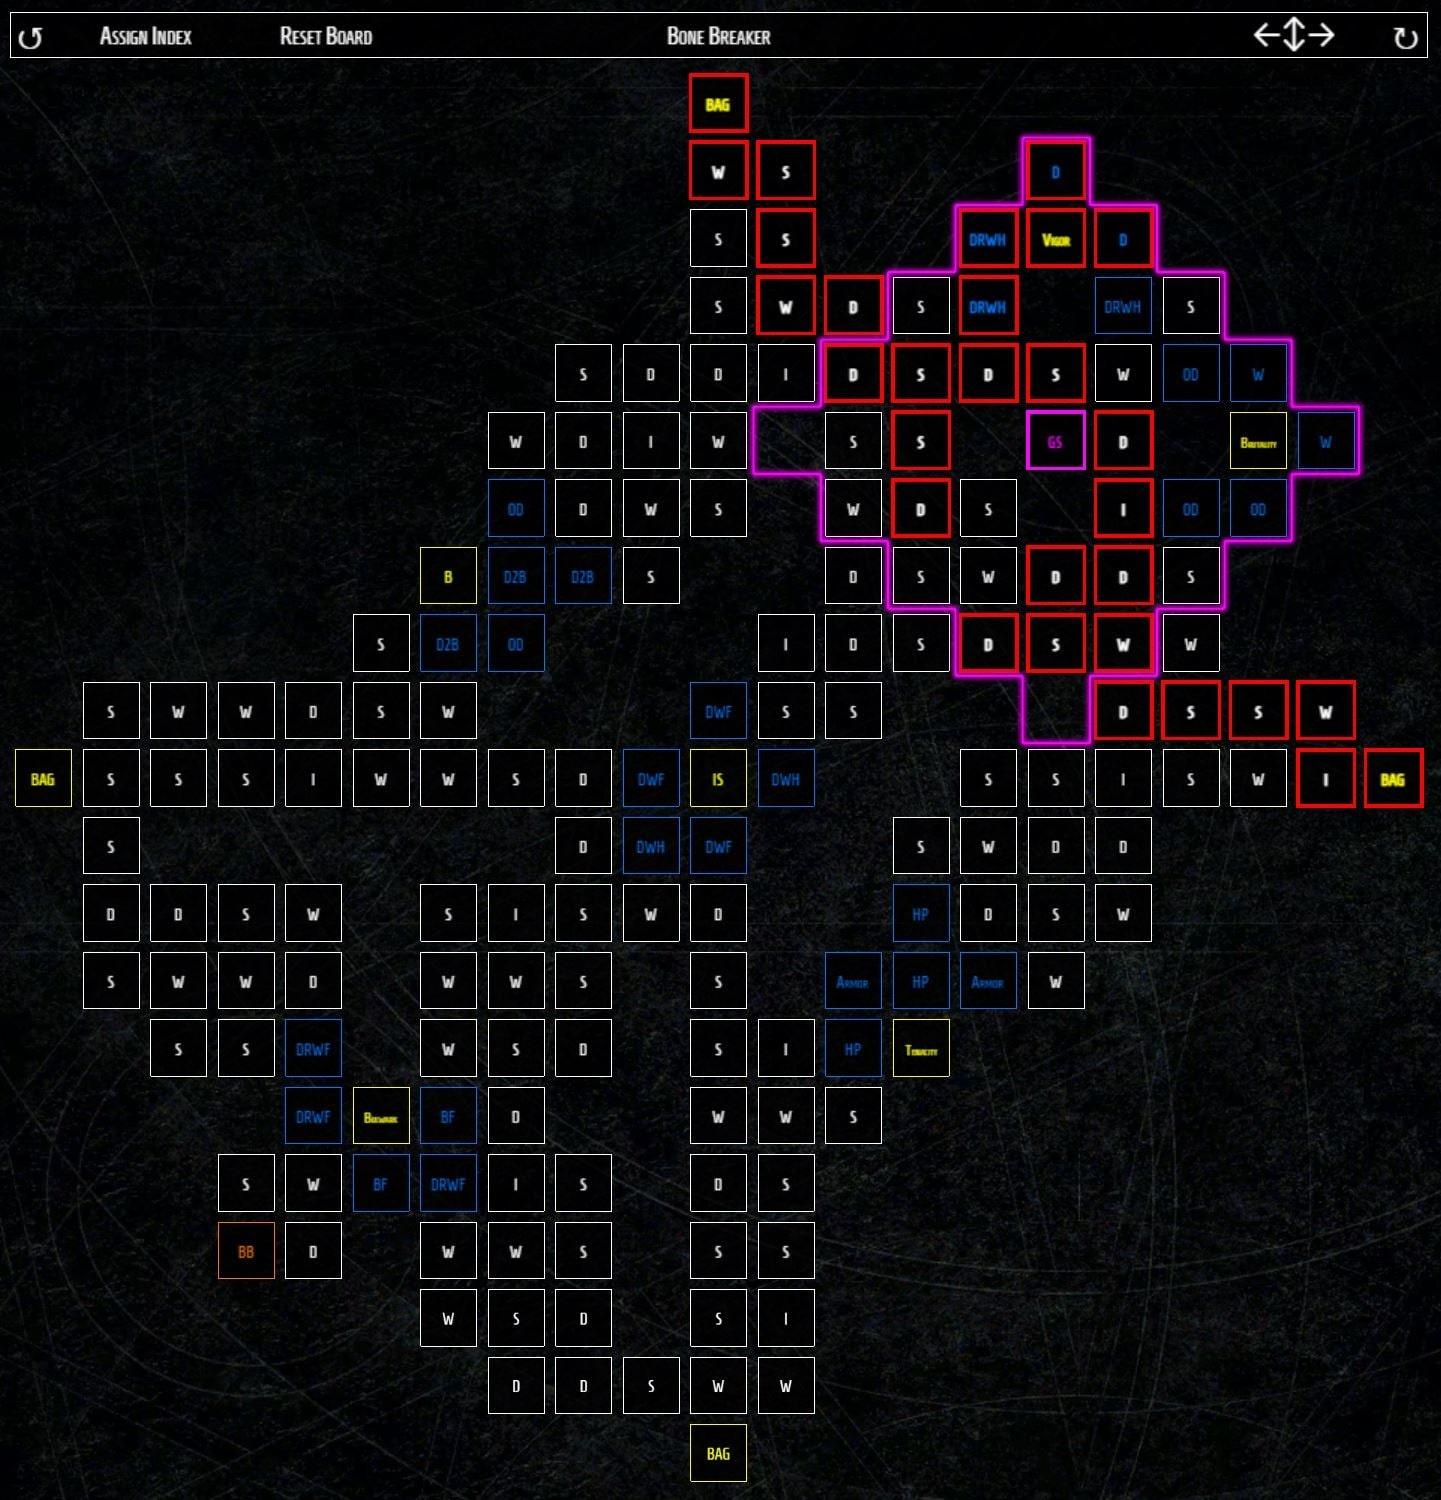
Rotate the board such that the Glyph socket is in the upper right corner of the board. Progress towards the Glyph socket and use the Exploit Glyph. Thereafter, in the vicinity of the Glyph socket, activate the Dexterity Nodes and also the Vigour Node. After doing so move towards the board exit near the upper left corner of the board. The next board you should attach is the Flawless Technique Board.
6. Flawless Technique Board
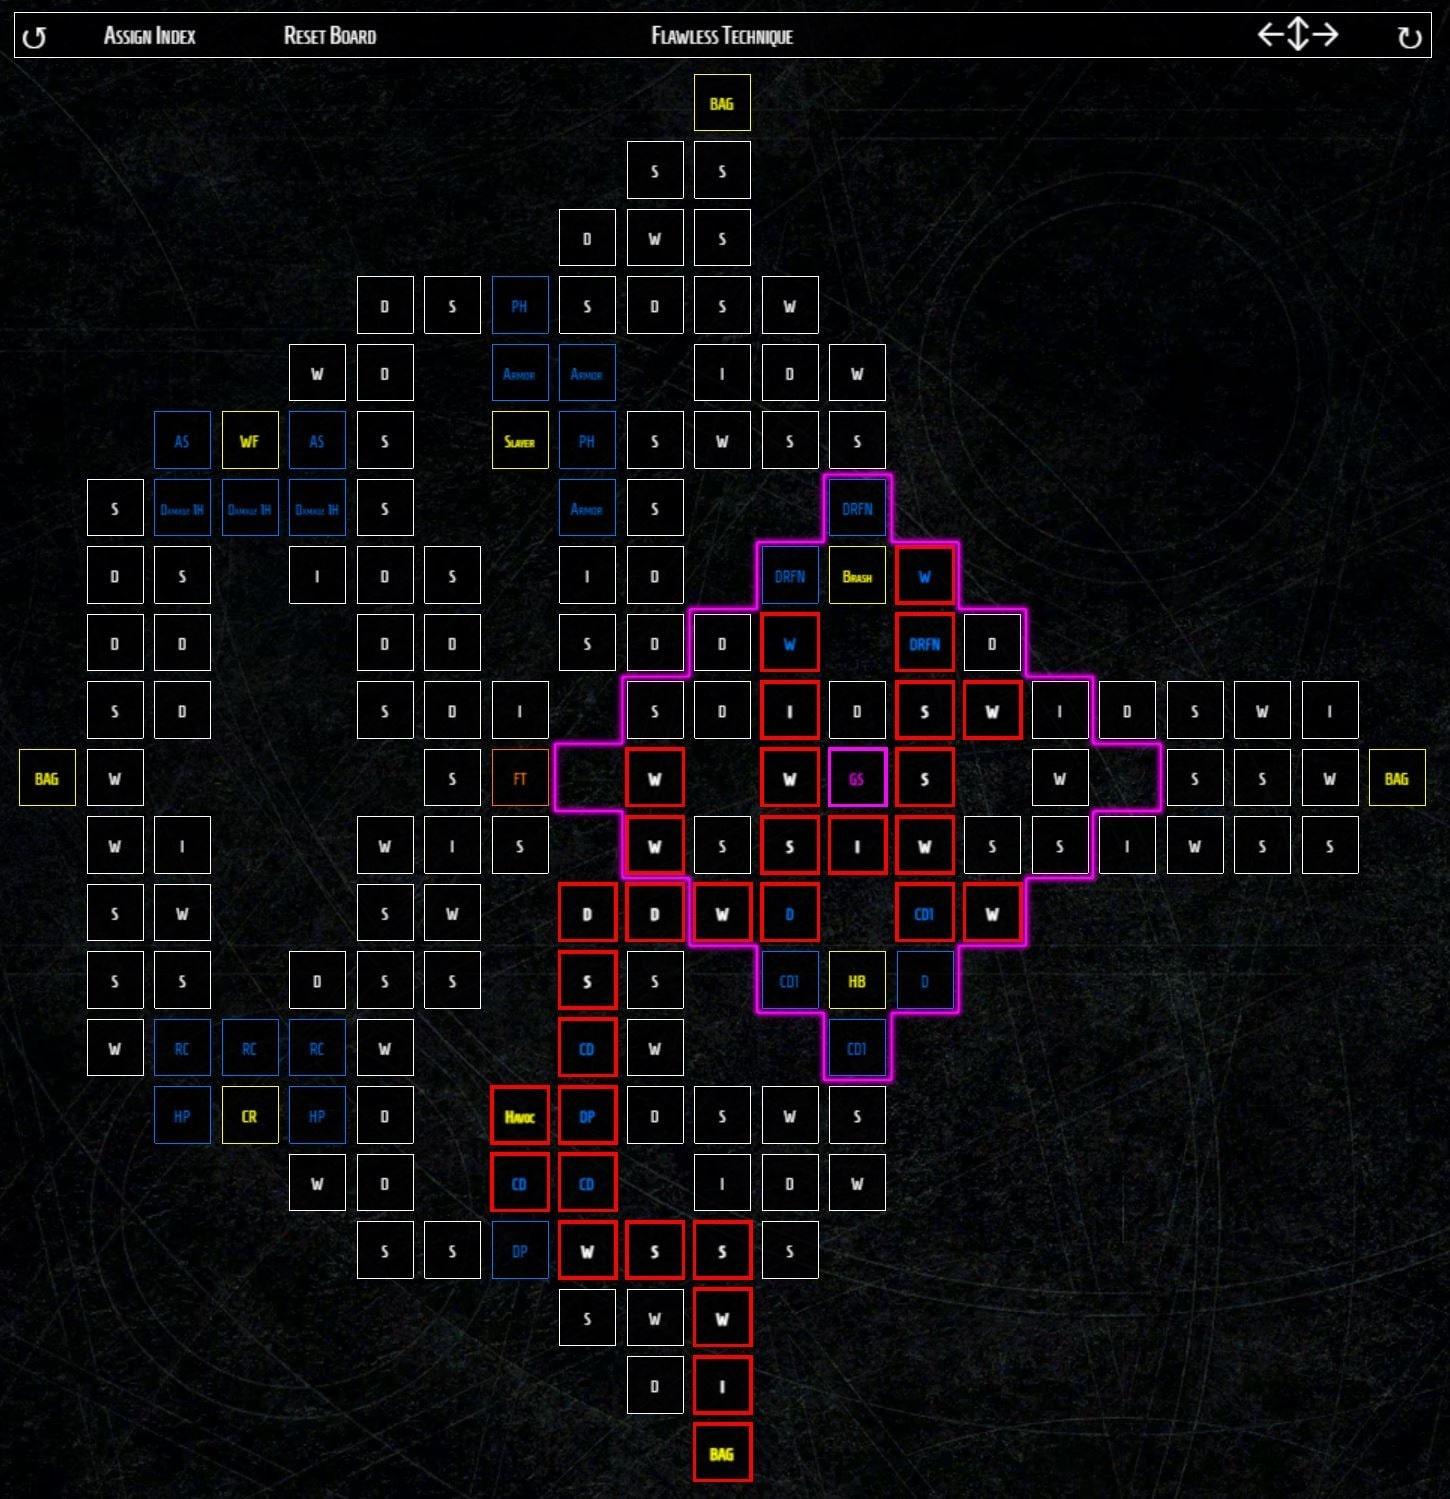
Before unlocking any sockets, rotate the board until the Glyph socket is just to the right of the center. Thereafter, unlock nodes such that you move towards the Havoc Node. After that, move towards the Glyph node and place Imbiber in it. Thereafter, it's all about unlocking the Willpower nodes that are within the influence of the Glyph socket.
Read more in our: The Complete Diablo 4 World Boss Guide (Timers, How To's)
Legendary Aspects
You can either get Aspects through legendary items or through Codex of Power. The Aspects got through Codex of Power are weaker, but they can be a good replacement in the absence of legendary items. Section below covers which Aspect to use with which equipment. In case you can't get the Aspect through legendary items, the section also covers which dungeon to complete to get the Codex of Power Aspects.
Suitable Equipment Type For Best Diablo 4 Barbarian Build
The build also relies on the type of equipment you choose. Below I will cover what stats you should check and pay attention to while choosing every piece of equipment. Apart from that, I will also go into the details of socket upgrades.1. All Weapons
When it comes to weapons, it's best to choose those that offer high Vulnerable Damage, Core Damage, Critical Strike Damage. Apart from that, the weapons that inflict high Slowed Enemies Damage are an added advantage.2. Helm
It's best to choose Helms that offer Cooldown Reduction, Maximum Fury generation, High Armour, Maximum Life and Strength.3. Chest
For Chest Armour, choose an option that provides Maximum life and Damage Reduction.4. Gloves
The best Gloves are those that lead to higher Rend rank, Attack Speed, Strength, and Crit Chance.5. Pants
When choosing Pants, always prioritize those that offer Increased Armour, Damage Reduction, and Maximum Life.6. Boots
The best Boots are those that offer higher Movement Speed and reduce Fury Cost.7. Amulet
Amulets should ideally offer more Fury points, Vulnerable Damage, and Cooldown Reduction. If amulets reduce the Fury Cost, that's an added positive.8. Rings
Rings should offer Fury Generation, Vulnerable Damage, Crit Damage, and Crit Chance. If you are wondering how to use the sockets, then check the section below to understand which type of Gems to fit in particular sockets.Limitations of best Diablo 4 barbarian build & how to overcome them:
Despite the build being so powerful, there are a few limitations you need to be aware of.1. Hard To Procure Resources
If you have gone through the post carefully, you would know that the build requires a lot of resources. For someone who has played previous Diabo games and is familiar with the gameplay, procuring so many resources isn't an issue. However, a beginner might find it difficult to procure the resources and utilize them properly.The best solution to this problem is to take a printout of this post and have it by your side when playing the game. Either that or you can keep this post open on your smartphone. That will let you know how to best procure and use the resources.
2. Use of multiple active skills
Another limitation of this build is that you need to use multiple active skills to fight off enemies and gain the needed resources. The best way to tackle this is to take it slow and go through the learning curve. That will help you remember the skills at your disposal and the best time to use them.3. Dependent on fury
The Rend build depends on Fury, but that isn’t a cause of concern. Many aspects of this build help you generate Fury points at a fast pace. If indeed you manage to procure resources for quicker Fury generation, the build being overly dependent on Fury won't hamper you and you can use the skills and attacks you want.4. Small AoE
Very few skills in this build can be used to tackle distant enemies. However, if you observe the build carefully, you will realize it relies heavily on damage reduction. Not only that, but it also has a lot of passive skills. These passive skills keep you well-protected when these enemies come nearby. It means you need not worry about the small AoE at all.FAQs
Is Barbarian bad Diablo 4?
Barbarian has a small AoE in Diablo 4 and has limited range. However, the ability to carry multiple weapons makes it one of the best classes in Diablo 4. So, No Barbarian isn't bad in Diablo 4.Who is the strongest Barbarian?
The Bear Totem or the Ancestral Guardian are the most powerful Barbarians.What is the strongest weapon for a Barbarian?
For Barbarians, the strongest weapon is The Greataxe. The reason is pretty simple: it results in maximum damage.Wrapping it up
Choosing the Barbarian class in Diablo 4 is a wise move. However, the only way you can utilize this class's abilities to the fullest is by going with this best diablo 4 barbarian build. Sure enough, it's a bit elaborate but stick to it and your character will become powerful with each battle you win.If you want to progress through the game faster, check out our Diablo 4 Nightmare Dungeons Boosting, Diablo 4 Power Leveling boost and Diablo 4 Glyph Leveling services.

Top 500
Secure your Overwatch seasonal rewards, today.

All rights reserved.
© 2015-2024 Boosting Factory
Boosting Factory isn’t endorsed or in any way affiliated with Activision Blizzard, Riot Games, Electronic Arts, Amazon Games, or Respawn Entertainment and doesn’t reflect the views or opinions of anyone officially involved in producing or managing Heroes of the Storm, Valorant, Overwatch, Call of Duty, New World, and League of Legends. All trademarks and logos belong to their respective owners. All submitted art content remains copyright of its original copyright holder.